2015. május 27., szerda

Toilet Roll Flower Stamping

Toilet Roll Flower Stamping


Here  are the things you may need:

  • Scissors
  • Toilet roll
  • Paint
  • White paper


Step 1 :We cut slits in the toilet paper rolls about 1-2 inches deep and then fanned out the strips. We cut different flower ends on the tip of each strip. Some of the kids cut triangles, some cut rounded ends, and some just left them as rectangles.


Step 2 :I put red, yellow, and pink paint on different paper plates and let the kids use their toilet rolls to stamp flower shapes onto their construction paper. At first, we tried to use a different stamp for each color, but they soon got mixed up and ended up making really beautiful flower colors. We also found that pressing each petal down while stamping gave a better result.


Step 3 :Most of the kids stamped 4 or 5 different flowers onto their pages and then we let them dry.

                                         
                                                   Toilet Roll Flower Stamping

Enjoy!

2015. május 21., csütörtök

Beading

3-D Seahorse


Level: Advanced

seahorseseahorse
Materials:
  • 8 yds. cord or wire
  • 1 lanyard hook or keyring
  • 2 black pony beads
  • 228 transparent pony beads in assorted pastel colors
Special Instructions: Wire is better for this pattern due to the size. Make sure to wire the spine as you go, twisting after each row. Attach the fin, tail and ear sections at the dots. To finish the animal, wire the sides together to make the animal three-dimensional


Giraffe


Materials:

  • 3 yards cord or plastic lacing
  • 1 black pony bead
  • 62 yellow pony beads
  • 59 brown pony beads


Unicorn


Materials:
  • 3 yards ribbon, cord or plastic lacing
  • 92 white pony beads
  • 14 grey pony beads
  • 5 black pony beads


Owl


Materials:

  • 3 yards cord or plastic lacing
  • 69 tan pony beads
  • 66 brown pony beads
  • 11 orange pony beads
  • 2 black pony beads


Diamond-Back Snake

Materials:
  • 2 or more yards cord or plastic lacing
  • Pony beads--Jade, Black, Glow-in the Dark, and Rust (number depends on how long you want to make snake)

Diamond back pattern can be repeated as many times as you want before ending with the tail.


Cat


Materials:
  • 3 yards cord or plastic lacing
  • 69 gray pony beads
  • 30 white pony beads
  • 4 pink pony beads
  • 2 green pony beads
  • 1 red pony bead
Special Note: These colors can be changed to match your pet cat, or favorite kind of cat.

The process is similar for such animals as the Hound Dog, Siamese Cat, Tie-Dye Bear, etc.

Help:

Level: Medium


3D beaded turtle ring tutorial

Materials needed: 


  • 4ft. of 8lb. or 10lb. monofilament fishing
  • 25-6/0 seed beads for shell
  • 14- 6/0 seed beads for body
  • 2 colors of 11/0 seed beads for ring band


Enjoy!

Lizard


Materials:
  • 3 yards cord or plastic lacing
  • 5 red pony beads
  • 25 black  pony beads
  • 62 dark  blue pony beads
  • 2 pony beads  any color ( for the eyes)

2015. május 17., vasárnap

Origami

Paper Bow/Ribbon

We Need:

  • Paper size used - 6 x 6 inch (15 cm) origami paper.


Origami Heart

We Need:

  • red origami  paper


1 Step:

Fold the bottom edge up to the horizontal crease . Then turn the model over


2 Step:

Fold the buttom edge  up to align  with the center crease on both sides. Then turn the model over.


3 Step:

Fold the left and right edges  in to align with the vertical  crease.


4 Step:

Fold  the two top corners down.


5 Step:

Fold the top tip down  to meet the bottom tip. Do not flatten the model.


6 Step:

Squash fold the two three - dimensional flaps.


7 Step:

Insert the top layer into the pocket in the layer below.


8 Step:

Fold down the two top corners.


9 Step:

Fold down  the two top points once again. 
 Enjoy!


Dolphin

We need:

  • blue origami paper
  •  scissors
  •  pencil


How to fold a dolphin (easy peasy)

Enjoy!

2015. május 8., péntek

Creative ideas

Toilet Paper Roll Wall Flower

Here  are the things you may need:

  • Toilet Paper Rolls
  • Glue
  • Scissors
  • Ruler
  • Pencil

Step 1.Collect as many toilet paper rolls and paper towel rolls you can get your grubby little hands on.

Step 2. Flatten the rolls so you can cut them into 1-inch circles (petals). There is no need to measure exactly! I cut the roll in half and then cut each half in half again, until I reached my desired size.


Step 3. Continue to cut rolls until you have reached your desired amount. It’s ok if they are not all cut perfectly even. The different sized rolls and different length cuts will add dimension to your piece.


Step 4. Start building your flower with a basic 5-point star formation. (You don’t have to start from this point you can make whatever shape you like.)

 Step 5. Start glueing the petals together. I used a hot glue gun, but you could use any type of glue you prefer.
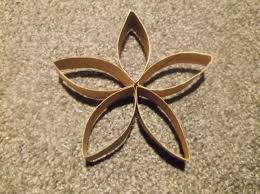
http://loveoffamilyandhome.net

Enjoy!


Paper Flower

That's why  they  are very popular decoration for home, parties, weddings and many  other occasions. There  are many  creative ways to make easy and beautiful paper flowers. Here's a perfect example.
Let's try it!


Here  are the things you may need:
  • Colored paper ( Green, Red)
  • Glue
  • Ruler
  • Scissors
  • Wire


1 step:

Cut the colored paper in strips with width of about 6 cm. The length depends on your preferences. If you want the pentals to be more voluminous, you can  use longer strips. Cut  fringes on the strip, leaving an edge  with a width of about 2 cm. Apply glue on the edge of the strip.


2 step:

Place one end of  the wire on the edge of the  strip and start rolling.


Place  it in a nice vase and enjoy!


Paper Rose

Paper flowers:  look like natural flowers but last longer and wont't wilt or droop. That's why they are very popular for party or home decoration.

You may need about 16 minutes to make one of these and then you can use them as decorations.


 Here are the supplies you may need:

  • napkins: yellow and green
  • a pencil
  • ribbon to tie the petals

 1 step:
2 Step:
3 Step: (6
 petal)
4 Step:
5 Step:

Enjoy!

Pencil box


Here are the things you may need:
  • Scissors
  • Glue 
  • Thread
  • Tin
 1 Step: bonded and rolled


Finish! Enjoy! 


Little Monster


Here are the supplies you may need:

  • Cardboard
  • Scissors 
  • Lead pencil
  • Glue
  • Callipers
  • thread
  • colorful paper


 Step 1: Trace two small circles onto thick cardstock (or cardboard). As a rule – the smaller your circle, the smaller your pompom. I used a shot glass for this step (keepin’ it classy)

Step 2: Place a smaller template (in my case, a nickel) in the center of your first circle and trace around it

 Step 3: Carefully cut your circle templates out (this does not need to be perfect)
Step 4: Place both circle templates together and tie a long length of wool around them
Step 5: Wrap the wool around the templates
Step 6: Keep wrapping…
Step 7: … until it looks something like this. If your length of wool runs out, not to worry, simply tie a new length  on and keep going – nobody will know. (Note: the more times you wrap the string, the denser your pompom will become. This pompom ended up being QUITE full)

Step 10: Once you’ve cut all around the template, spread the two cardstock pieces apart
Step 11: Thread a short length of wool in between the two cardstock templates and tie it in a tight knot. Then, carefully pull the cardstock templates off at either side.


Good Jobb!