Cute Simple Nail Designs
Materials:

1 step:Apply bace coat let dry.

Step 2:Use hole puncher to make shape, press firmly on the nail.

Step 3:Paint carefully over tape lift genty before it dries.

Step 4:Add glitter over heart then top coat and you're done!

Water Marble Nail Art
For this nail art, you'll need:
- A container filled with water (preferably bottled water)
- Nail polish remover
- Sticky tape
- Nail polishes of your choice
- Base coat
- Top coat
- Tooth picks
- Scissors

Step 1:
Paint your nails with a clear base coat. Spray with fast-drying spray if you want.
Step 2:
Paint your nails with the nail varnish. I recommend 2 coats.
Step 3:
Put sticky tape around your skin and cuticles. Be sure that the tape doesn't touch the nail. If the tape is covering the nail, it will ruin the effect, because some parts will be white .

Step 4:
Add the nail varnish to the cup. Put some nail varnish on the brush. Hold it 1 cm above the centre of the waters edge.
Gently tap the handle of the brush until the varnish drips into the water. Add a second colour in the same way into true middle of fat colour. Carry on the pattern in this way.
Gently tap the handle of the brush until the varnish drips into the water. Add a second colour in the same way into true middle of fat colour. Carry on the pattern in this way.
Step 5:
Using a tooth pick, stir the clear water surrounding the circle of nail varnish. Thus will make the nail varnish ring expand. Make sure the toothpick DOES NOT TOUCH the nail varnish itself, only the clear water.

Step 6:
Place the toothpick on the water, from about the 3rd ring out. Drag the toothpick inwards, towards the centre of the nail varnish. Continue in this way in order to make a flower pattern.
step 7:
Dip your finger on the water (where the nail varnish pattern is) at a 45 degree angle.Keep your finger in the water, and use a clean toothpick to roll around the un-used nail varnish to pick it up. Then, take your finger out of the water. Be sure not to smudge the design whilst doing this.
Spray the nail with some quick-dry spray, or leave to dry. Carefully peel off the tape from your finger. Start with the piece that you put down last

Dye Your Hair with Crepe Paper
What we are going to need is...
1) CREPE PAPPER------ yes the most important part of the process....
2) Gloves
Really important: Crepe paper only works if the hair is blonde!!!! iI know... it sucks.. but since Im not blond I had to bleach it..
Step 1: First you need to choose the color of the paper u want ..... I once chose blue and it Turned out to be a little bit lighter at the end ..
third put on your gloves.... grabb the paper, make a little ball with it, and let the water run... you will see that when the paper gets wet it will start losing the colour..
I didnt notice any difference between hot and cold water...

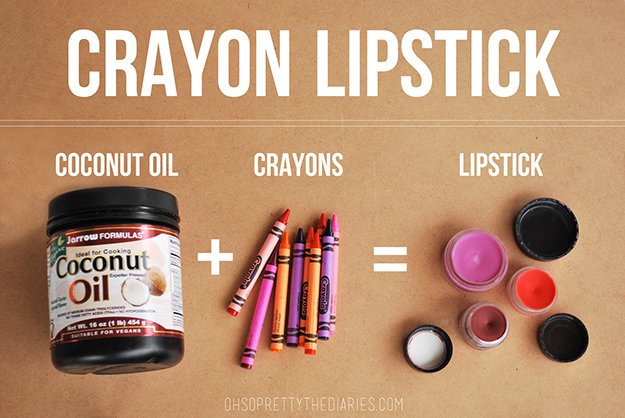
Lipstick Colors With Crayons
To Make Lipstick You Will Need:
- Coconut Oil
- Crayola Crayons (as many colors as you like)
- A jewelry or tool organizer
- A pot of water
- A small glass bowl
Step 2.
Place a crayon on a napkin and cut it about once inch from the tip. In this example we will use pink. This will make a color in MAC Lipsticks Amplified collection. The color is called Impassioned! If you’re a color fanatic you’ll know the color I’m talking about.
Step 3.
Remove the paper from the part of the crayon that you just cut like so
Step 4.
Fill a pot of water about this size
Step 5.
Set the temperature from LO-MED
Step 6.
Place a bowl or cup in the middle of the pot full of water (this will serve as a melting pot).
Step 7.
Take out your coconut oil. This is where you will determine which finish you want for your lipstick. If you’re looking for a sheer finish use 1/2 a tsp of coconut oil per inch of crayon. If you’re looking for a matte finish, use 1/4 tsp of coconut oil per inch of crayon.
Step 8
Mix the desired amount of coconut oil with the portion of the cut crayon and put them into the center pot.
Step 9
Once the crayon and coconut oil have fused together, you can pour it into your jewelry tray! Make sure all of the ingredients are mixed well and you have a creamy texture. Pour hot liquid into your tray like this

Gradient Mermaid Nails
When we were kids, at one point we all would have wanted to be or become a mermaid.
- turquoise nail polish;
- royal blue and emerald green nail polish (preferably with glitter in them);
- sponge;
- some fishnet;
- small nail decorations that look like gems;
- top coat;
- acetone and q-tips to clean out the excess polish on skin.
Directions:
1. Start with applying one layer of turquoise nail polish on your nails and let them dry very well.
2. Take the sponge and apply the other polishes to it, the green and blue, because you will have to dab them over every nail. Before dabbing make sure you hold the fishnet over the nail.

3. Repeat for each and every nail, and soak the sponge with polish as many times you need.
4. Take the small decorations and apply them randomly here and there to give a much shinny effect to your nails.
5. Apply top coat over then let the polish dry very well.
6. Clean all the polish from the skin if there is any there and you are done with making mermaid nails.

Ombre nails
f you like doing your nails at home, you probably already have everything you need to do this. If not, you definitely don't need to break the bank.
Supplies:


- Base coat
- White nail polish
- Nail polishes for the gradient in the colors of your choice
- Top coat
- sponge
- Scissors


Enjoy!